Now that your web project has been built and passed internal testing, it’s time for you to take the testing wheel. But where do you put any feedback you may have? Do you send us a zillion emails? Nope. Do you pick up the phone every time you spot something? Nah. There’s an easier and far more efficient way of handling feedback — Basecamp.
Basecamp is where we gather feedback, share ideas and track progress on projects in their beta testing, or user acceptance testing (UAT), stage. We set up the to-do lists so they’re all ready for your comments. To better serve you (and so we all know what we’re doing), we’ve set out some guidelines to help you use Basecamp in a way that works best for everyone involved.
Overview
- You’ll receive an invitation to the project through which you will be able to log in to view it.
- Familiarise yourself with the headings (which we’ve already set up for you) and their descriptions so you know where to put what.
- Add to-do items under the appropriate headings along with supporting files and/or screenshots and assign them to a Boxharry team member. Only one issue per to-do, please. (See “How to write a to-do entry” below.)
- Click on a to-do item to review any comments or questions left by our team. You can do this by clicking the item in Basecamp or the “View this on Basecamp” link in the related email sent when a comment has been made.
- Comment further on items as necessary, being sure to re-assign them back to the person who assigned them to you.
- Once you’re happy an item has been successfully completed, mark it as complete by ticking the checkbox to the left of the to-do item.
- The invitation
- The Projects page
- The to-do lists
- How to write a to-do entry
- Punctuation is important
- One issue per item
- Editing and Commenting on to-dos
- Completing a to-do item
The invitation
Once your project has been released to you for UAT, we will send you an invitation to join the Basecamp project. If you’ve never used Basecamp before, you will need to create login credentials (e.g. password). Because you create this yourself and because Basecamp is a third-party software, we will not have a record of your login credentials, so please make note of them and / or have your browser remember them for the future.
The Projects page
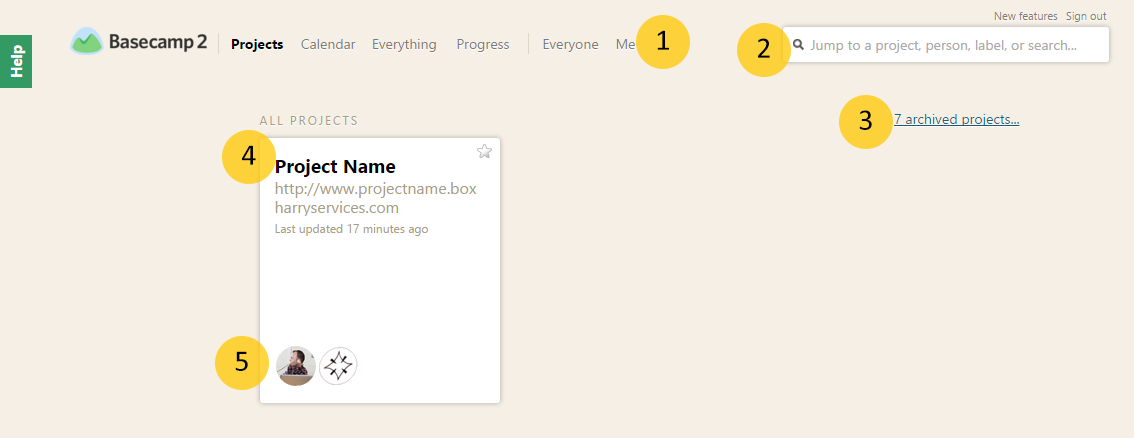
Once you’re logged in, you will land on the Projects page where you will see all of your active projects (Fig. 1).

- Project navigation — “Me” displays all to-dos assigned to you
- Project search
- Link to any archived projects
- Project overview panel — click this to go into the project
- Icons of people on the project
Once you click into the project, you will see the project’s overview page (Fig. 2). Here you can see if there are any updates, discussions or to-do items for the project.

- The name of the project
- Project description, usually the URL of the test system
- To-do lists and “add” button — click “To-do lists to see a list of all to-do lists (Fig. 3); click “Add a to-do list” to add a new to-do list to the project
- Link to watch a helpful video about to-do lists (may not appear on your screen)
- To-do list heading — click to see only items in this to-do list on its own page
- 6. To-do list description
- Blank to-do item (“***“is a placeholder to keep the to-do visible. Once all items in a to-do item are completed, the to-do list is moved to “Completed”, so we use a placeholder to keep the list visible (and prevent duplicate lists from being created) in case more items need to be added once others have been completed.)
- Add a to-do — click to add a to-do item

- Drop-down selector to filter to-dos by assignee
- Drop-down selector to filter to-dos by due date
- Clickable list of all current to-do lists
The to-do lists
The to-do lists have been set up by section and there is a helpful description of what each list is for just below the heading so all the information gets put in the right place. If you have something that needs our attention,
- just click "Add a to-do" (#8 in Fig. 2 above) below the relevant heading to toggle open the to-do editor (Fig. 4),
- attach any helpful screenshots or files (#4 in Fig. 4),
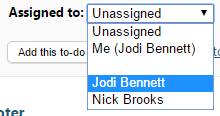
- assign it to a Boxharry team member (#2 in Fig. 4; Fig. 5),
- and click "Add this to-do" (#5 in Fig. 4) to save and close your item.
Once an item has been completed, we will then assign it back to you so you can re-test it. If you are happy, tick the item off to close it (checkbox to the left of each to-do item).

- Entry field
- Drop-down selector for assigning the to-do to a team member (Fig. 5)
- Link to add a due date, if necessary
- Link to attach files — toggles open the file manager
- Add this to-do button — saves the to-do entry to the list and closes the editor
- I’m done adding to-dos — cancels the entry and does not save changes

How to write a to-do entry
It is helpful to have all to-do items start with their location or path. We like to use all caps for this part because that acts as a visual aid to both easily identify similar locations and to distinguish it from the issue. So if you notice something on a page called “Our Future” in a sub-section of the About Us section called “Legacy of success”, for instance, you would write it under the “About Us” heading. It would look something like this:
About Us
LEGACY OF SUCCESS > OUR FUTURE: The heading font should be black instead of red.
Here is the same entry colour coded:
About Us
LEGACY OF SUCCESS > OUR FUTURE: The heading font colour should be black instead of red.
Breakdown of to-do item:
This is the heading which has already been added for you.
SUB-SECTION or PAGE > PAGE (if sub-section used before “>”), AREA or SECTION OF PAGE: Very detailed description of issue (including exact steps taken to recreate the issue, if applicable).
It’s important to be very detailed and specific about the issue; include as much information as possible. Telling us that the letter “a” in the word “amazing” needs to be capitalised is not enough. We need to know which page, which paragraph, which sentence — you get the idea.
Punctuation is important
When you’re adding your to-dos, please use punctuation. It is difficult to understand what exactly needs doing if there is no punctuation either in a sentence or separating sentences.
One issue per item
Give each issue its own space. Please only enter one item per to-do. If, for instance, you have noticed three things on the "Contact us" page, please make a new to-do item for each one of those items. Although you might think they are related because they all happen to be on the same page or are related to, say, the same form item, they probably aren’t from a development point of view. Some things may need to be dealt with by different departments.
For example, let’s say the spacing between the “Submit” button and the last form field on the enquiry form on the “Contact Us” page is too wide and this same button doesn’t appear to submit the form. These two things, although both related to the “Submit” button on the same form on the same page, would not be handled by the same department. The former issue is a styling issue and goes to the front-end developers whereas the latter issue would be handled by the back-end developers. Hence the need for two to-do items.
Editing and Commenting on to-dos
If you need to make changes to a to-do item you’ve already entered and saved, hover over the item to bring up the edit tools (#1 in Fig. 6). Here, you can either delete the item or edit it.

- Edit tools allowing you to either delete or edit the to-do
- On hover, the to-do becomes a clickable link which takes you to its page
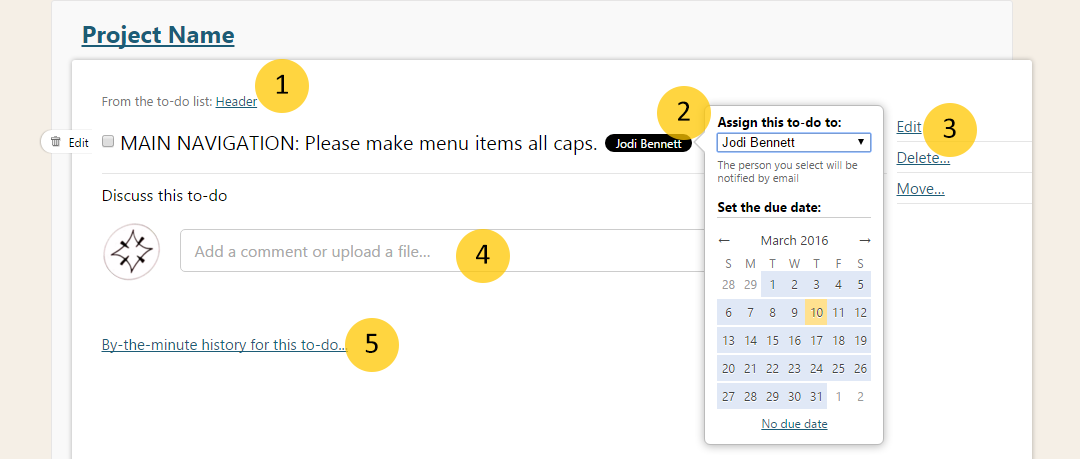
Once a to-do item has been created and assigned to someone, if there are any further supporting items or helpful information to add or questions to be asked, you can click an existing to-do item in order to add these (hover over the item to see it change to a clickable link — #2 in Fig. 6). Doing so will take you to the item’s page. Once you have commented, it is important that you re-assign an item back to the person who assigned it to you, unless you are marking the item as complete. This is how we keep track of who needs to do what. If items are still assigned to you even though you have commented on them, we will think the item is still with you for review.

- Link to current item’s to-do list
- Assignee — click to reassign via the pop-up selector
- Edit, Delete or Move the to-do item
- Comment field — clicking into this field toggles open the editor (Fig. 8)
- View a list of every action that has been made on the to-do item

- Text formatting tools
- File manager — you can drag & drop files or click to select them from your computer
- Select who to notify via email individually
- Filter recipients by company
- Saves changes and adds the comment to the to-do
Completing a to-do item
As previously mentioned, once you’re happy with the outcome of a to-do item, just mark it as complete by ticking the checkbox to the left of the to-do item. This will move it to the bottom of the list where you can untick it if you’ve made a mistake. Once you leave the page, the completed item will move to a “Completed” list. In order to see it or make any changes to it, you will have to view completed to-dos, located at the bottom of the project overview page seen in Fig. 2. You can access this page by clicking the project name at the top of any screen.
That’s it. Happy Basecamping!
Comments